Want to learn how to create your own wireframes? With our detailed guide, you’ll learn every step of the wireframing process as well as industry best practices and popular tools.
Wireframing is an essential step in the UX design process, guiding design teams in the creation of digital interfaces that meet the needs of users and align with the goals of the business. This early representation of a website, app, or digital platform provides designers and stakeholders with a visual blueprint that can be used for collaboration and iteration, enabling teams to improve and refine a design before it is implemented.
In this comprehensive guide, we’ll walk you through the essential steps you need to master wireframing, outline different types of wireframes, and explain the role of wireframing in the UX design process. We’ll also highlight the best wireframing tools and software, provide tried and tested best practices, and answer commonly asked questions about the process. By the end, you’ll have the knowledge you need to create intuitive and effective wireframes for your user interfaces.
Contents:
- What is a wireframe?
- The benefits of wireframes in the design process
- The role of wireframes in the design process
- Types of wireframes
- Desktop vs mobile wireframes
- How to create wireframes: a step-by-step guide
- Best software for creating wireframes
- Best practices for effective wireframe design
- FAQs
- Next Steps
Ready to learn more about wireframing? Then let’s dive in.
What is a wireframe?
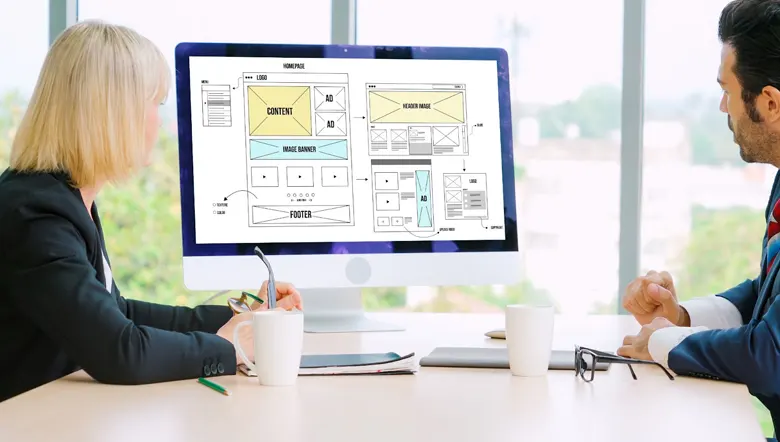
A wireframe is a sketch or basic blueprint created by designers to provide a visual representation of a digital interface, usually a website or an app. Its function is to guide the design of the interface and provide a starting point for collaboration between designers, developers, and stakeholders.
Wireframes are usually sketched out during the initial stages of the design process and have simple, skeletal structures that indicate how a designer envisions the layout of a website or page. The designer will also use the wireframe to highlight different on-page functions and organize the hierarchy of design elements such as text or buttons.
The benefits of wireframes in the design process
Creating wireframes offers numerous important benefits to designers and is a crucial step in the design process. As well as providing a clear structure within which elements and content can be arranged, this early visualization of the design enables the team and other stakeholders to get a feel for the basic layout and functionality of an interface at an early stage in the process. With the wireframe acting as a common reference point, wide-ranging feedback from different teams can be easily gathered. This enables the design team to make the necessary changes and improvements before significant resources are invested into development and ensure all needs–both of the user and the business– are adequately addressed.
In addition, wireframes are important in UX design due to their emphasis on functionality over decoration or visual design. By prioritizing the creation of an intuitive and seamless user experience with a digital product, designers can ensure central features and user touch points are defined and easy to interact with.

The role of wireframes in the design process
Within the design process, wireframing is among the first few steps. A designer always begins the design process by performing research into their target users- needs, challenges, behaviors, and preferences- before looking closely at the organization’s direct competition and the market as a whole. It is with this accumulated knowledge and information that they begin the process of creating wireframes for their digital product.
The role of the wireframe is to determine the arrangement of different content types and their functionality based on what the designer already knows of the user’s expectations and industry best practices. By presenting this information visually but without too much detail, designers are able to envisage the user experience with the product and refine the design based on feedback rounds with designers and other teams.
Types of wireframes
What’s the difference between low and high-fidelity wireframes? Let’s take a look.
Low-fidelity
A low-fidelity wireframe is drawn using simple lines and shapes. Instead of detailed elements, placeholders are commonly used to indicate which particular design feature, piece of content, or functionality should exist in its location. The focus of the low-fidelity wireframe is on the structure, layout, and general flow of a digital interface and seeks to avoid the inclusion of any unnecessary detail or decoration. Low-fidelity wireframes can be drawn by hand or using digital wireframe creation tools.
High-fidelity
In contrast to low-fidelity wireframes, high-fidelity wireframes seek to offer a more detailed version of the design. These wireframes are usually created at a later stage in the design process, once significant research has been completed and after the structure and functionality of the design have already been established. This version of the wireframe is more refined and has likely been iterated on a number of times by the team. Typically a designer will use prototyping tools or software to create high-fidelity wireframes, adding design elements such as colors, icons, typography, and images. When complete, the high-fidelity wireframe will closely resemble how the designer envisages the final website, app, or digital surface to look.
Desktop vs mobile wireframes
Due to the number of differences between desktop and mobile interfaces, UX designers are required to create different wireframes for each. The major differences between the two are screen size and resolution; mobile device screens are smaller and more varied than desktop screens and designers need to adjust their wireframes to take this into account. Mobile wireframes also tend to focus on vertical scrolling, touch-friendly buttons, and content that is concisely displayed to ensure users enjoy optimal viewing and interaction experiences on their smartphones or tablets.
The smaller screen sizes of smartphones and tablets also impact a user’s navigation and interaction experiences on mobile devices, requiring wireframes to focus on simplified and optimized elements that work well with touch-based inputs. The same elements on a desktop can be larger and less concise as users can more easily navigate a larger interface and typically interact with a mouse, not a finger. Font and element size also need to be considered carefully here to ensure that, whether on desktop or mobile, precise scrolling and clicking (with a finger or a mouse) is easy to achieve.
Finally, the elements that are prioritized on desktop wireframes can be different from those prioritized on mobile wireframes. This is because users will be interacting with mobile devices in different contexts than desktop devices, and their needs, goals, and expectations of the user interface will be different. Performance and speed of mobile wireframes, including loading times, data usage, and offline support, will also need to be taken into account.

How to create wireframes: a step-by-step guide
Let’s now take a look at how to create wireframes for your design project. We’ll be going through each step of the process from choosing your tools to team input and iterations.
Gather requirements and assess the scope of the project
Your first step would be to gain a clear understanding of the scope of the project and gather what’s necessary to start sketching. To do this, you’ll need to conduct interviews and workshops with project stakeholders such as design leads and project managers to gain clarity on their specific needs and objectives for the project. While conducting these interviews, carefully document the process and the outcomes, as well as clarify any uncertainties. It’s important to do this as early in the design process as possible to avoid misinterpretations and ensure that no time or resources are wasted.
At this stage, you will also benefit significantly from studying your competitors. This can give you valuable insights into the specific functionalities, features, and standards users will expect from your design.
Once you’ve gathered the details of the project from key stakeholders and analyzed the digital interfaces of your competitors, you’re in a strong position to put together a detailed project plan outlining your project timeline, deliverables, and each individual’s responsibilities to ensure the whole design team is aligned.
Identify key user flows and functionalities
A successful wireframe is informed by key user flows and functionalities. This data helps the team prioritize design elements and keeps everyone focused on how users will ultimately interact with the final interface. To uncover this data, you’ll need to conduct extensive user research. This might involve distributing surveys to target user groups, performing one-on-one interviews with users, or performing usability testing. These research activities will help to uncover common user pain points, challenges, preferences, and goals. Once the research is completed, the design team can correctly identify and prioritize the key functionalities of target users based on their actual needs. This knowledge, when combined with the company’s own business goals, ensures the team creates wireframes centered around delivering the most value for end users and achieving the best results for the company.
Choose the right tools
There are numerous criteria to look out for when selecting your wireframing tools. Here’s a breakdown of what to consider:
- What is the complexity of the project?
- What are your team’s collaboration needs?
- What are your personal preferences?
- How compatible is the tool with the other design and development tools you are using?
- How much training or support is needed to learn how to use the tool?
With these questions in mind, you’ll need to research and test a range of wireframing tools until you find the one that best meets your project and team’s specific requirements.
Sketch initial ideas and layouts
Your next step in creating a wireframe is to begin drawing rough sketches of the interface’s potential layouts. These sketches should be based on the results of your user research and informed by the key functionalities of the design and the key user flows. At this stage, it’s advisable to experiment with different arrangements of design elements, such as buttons, text, and boxes to help you visualize how your layout might best function to meet user needs. Rather than focusing too heavily on getting your wireframe perfect, concentrate on generating multiple variants of the digital interface that most effectively capture the essence of your project and strive to optimize the user experience based on what you know of the user.
Whether creating the designs using pen and paper or a digital tool, be sure to iterate quickly and often on your ideas until you have a layout that you are happy with.
Define structure and hierarchy
In order to establish the overall layout of your wireframe, it’s helpful to define key sections of the design and identify each section’s relationship to one another. To begin this process, you’ll need to determine the hierarchy of the content, ie, which elements are more important than others and should be placed more prominently on the page. Next, by looking at the flow of information and how users interact with it, ensure that the structure supports and guides users as they navigate this experience. Finally, by using visual cues such as typography, size, and color, emphasize the importance of each element.
Add basic elements
With the structure and hierarchy defined, you’re ready to start including the basic design components in your wireframe. These might include headers, menus, and content boxes. Rather than including lots of detail, instead use placeholders or simple shapes to represent blocks of text, buttons, images, videos, or any other interactive elements. At this stage, you should be focusing on using these design components to reinforce a clean and easy-to-navigate layout. The aesthetic considerations of the interface will come after this initial wireframe has been signed off by the whole team and the project’s stakeholders.
Incorporate feedback and iterations
Your final step, and one of the most important, is to share your wireframe with the design team, project stakeholders, and target users for insights and feedback. Your goal here is to gather a range of opinions on the design’s usability as well as its effectiveness at meeting the user and business objectives that were set out in the project’s initial strategy.
One of the most popular and effective ways of gathering user feedback on your wireframe is via usability testing. With a wireframe, this might involve observing the user as they attempt to complete a task using the interface you’ve designed. The idea behind usability testing is to identify user pain points or areas of confusion. With this information, and any other feedback from stakeholders and your design team, you can identify areas for improvement on your wireframe and create new versions to address these issues.
An excellent way to understand how feedback can impact the final designs is to refer to projects and case studies of popular brands. However, if you are just starting out, we recommend checking out this detailed UI UX Project by AND learner Aromal Jose Baby for actionable insights and practical guidance.
With every new version or alternative that you create of your wireframe, you’ll need to repeat the feedback loop, gather user insights, and make adjustments until it meets the project’s goals and satisfies the needs of your users.
Best software for creating wireframes
Although your initial low-fidelity wireframes can be created using just paper and a pen, to create more detailed high-fidelity wireframes you would be wise to employ a wireframing tool. Here are five of our favorite wireframing tools you can check out when you’re ready to refine your design and share it with other project stakeholders.
Balsamiq
Balsamiq is the ideal wireframing tool for creating fast, digital sketches of your interface. This is a great tool for beginners due to its user-friendly design and its focus on user flows and on-page content. As well as providing common components required for sketching a website, the tool enables quick iterations based on stakeholder and user feedback.
Miro
Miro has created a completely free wireframing tool within its visual innovation workspace. With the support of templates and widgets, users are able to create and iterate on wireframes quickly and easily, while its real-time collaboration function ensures full team alignment at every stage of the project.
Figma
Figma’s Online Wireframe Kit is the ideal solution for designers looking to speed up their website design workflow. With a drag-and-drop interface and customizable design elements, Figma’s wireframing software is an inclusive and invaluable tool for designers of every experience level.
Moqups
Another great choice for junior UX designers or wireframing beginners, Moqups is a minimalist and user-friendly wireframing tool that supports the creation of all manner of designs including wireframes, mockups, sitemaps, and graphs.
Sketch
Sketch is considered the premier wireframing tool by many professional UX designers. It has a simple and intuitive interface, and, thanks to its accessible design, it’s easy for users to create wireframes at speed using artboard and vector design shapes.
Best practices for effective wireframe design
To ensure the success of your wireframes, keep in mind these industry best practices.
1. Keep it simple and focused
While it’s always tempting to make your designs look nice, wireframing is not the time for adding any unnecessary detail or decoration. Instead, keep your wireframes simple by focusing on core functionalities and meeting user needs. Simplicity in the design supports cross-team communication and ensures everyone understands the intended usage of the interface. This helps to reduce confusion and the number of iterations required later on.
2. Use placeholders for content and imagery
In line with the “keeping it simple” theme, avoid adding content or images at this stage and instead use placeholders. Your team just needs to know what your intended design for the platform is and whether it meets its required function, not exactly how it will look in its final iteration.
3. Maintain consistency and clarity
As with all aspects of UX design, consistency and clarity are key when crafting effective wireframes. This includes ensuring that your selected color palette, typography, and layout remain uniform throughout the design and that your icons, structural elements, and placeholders are clearly labeled.
4. Consider usability and accessibility principles
Prioritizing usability and accessibility principles when sketching wireframes is important to ensure that your interface is as inclusive as possible. This involves organizing your content intuitively and logically, adhering to accessibility standards, and incorporating clearly labeled navigational cues.

FAQs About Wireframes and Wireframe Design
Let’s take a look at the answers to some of the most commonly asked questions on wireframing in the design process.
What are the three different components of a wireframe?
You can divide a wireframe into three essential components: layout, content, and functionality. The layout component refers to the overall structure of the digital interface you are designing, the content component communicates what kind of content you plan to publish on the interface such as text, images, or videos, and the functionality component refers to interactive elements of the design such as buttons, menus, and input fields.
How do you draw a good wireframe?
To create a good wireframe, a designer usually begins by drawing the layout of the interface using lines and simple vector shapes, focusing on an intuitive content hierarchy and seamless user navigation between components. From this starting point, the designer will gradually insert more detailed content and interactive design elements while aiming for clear communication and a simplistic overall design.
For a more detailed guide, we recommend following the steps outlined in our article.
Is Figma good for wireframes?
Figma’s free, online Wireframe Kit has a number of advantages for designers. Not only does the tool enable users to add interactivity to their wireframes without the need for any coding knowledge, but the kit’s pre-built wireframe screens and design components mean designers can simply drag and drop the elements they need with a few clicks of a mouse. Finally, the comments feature enables teams to collaborate and provide feedback on the design itself, ensuring all team members are fully aligned and all iterations are up to date.
How do I start a wireframe design?
Your starting point when creating a wireframe is to define your objectives for the design. What are the primary goals of the business? What are the user’s needs when using the interface? You’ll also want to discuss with your team what the scope of the project is, what the timelines for the design are, and what your resources are. Once you have a good idea of your scope and limitations, as well as your business and user needs for the interface, you can start sketching rough layouts using basic shapes and lines to establish the overall flow and structure of the design.
Next Steps
With our step-by-step guide to wireframes and wireframe design, we hope that you now feel confident in creating your own low and high-fidelity wireframes. Whether you’re working as part of a design team or looking to experiment with your own designs, a wireframe provides a great blueprint on which to organize your content, prioritize elements, and ensure seamless navigation for your users.
To find out more about UX design and wireframing, head over to our blog for more articles like this one! If you’d like to learn more about UX design, consider going through the following resources:
- Watch this session by Shiva Viswanathan, Design Head of Ogilvy Pennywise, and Naman Singh, Product Experience Designer at RED.
- Talk to a course advisor to discuss how you can transform your career with one of our courses.
- Pursue our UI UX Design courses – all courses are taught through live, interactive classes by industry experts, and some even offer a Job Guarantee.
- Take advantage of the scholarship and funding options that come with our courses to overcome any financial hurdle on the path of your career transformation.
Note: All information and/or data from external sources is believed to be accurate as of the date of publication.

