Want to learn how to build a website wireframe? In this guide, you’ll find the steps and best practices you need to follow as well as our recommended tools to assist in creating your first wireframe sketches
Wireframes represent a UX designer’s vision for a digital interface like a website or app and provide an important visual blueprint for design teams, stakeholders, and developers to refer to and collaborate on throughout the UX design process.
If you want to learn how to create your first website wireframe, then you’re in the right place! In this beginner’s guide, we’ve compiled seven simple steps to help you out. In addition, we’ve got top tools, best practices, and answers to your frequently asked questions, so that by the end you’ll have everything you need to sketch a website wireframe that works for your project and team.
Contents:
- What is a wireframe?
- Why wireframes matter
- Different types of wireframes
- Seven steps for creating a website wireframe
- Best practices for wireframing
- Top wireframing tools
- FAQs
- Conclusion
Ready to dive in? Then let’s go.
1. What is a wireframe?
A wireframe is a blueprint created by UX designers that typically consists of lines and simple shapes depicting the design elements of a website, app, or other digital interface. This visual representation communicates a designer’s vision for the layout, structure, and functionality of an interface and provides a common reference point for future iterations and improvements, user testing, and when approved by all stakeholders, a clear guide for the development team to work with during the implementation phase of the design process.
For a detailed overview of the wireframe design process, here’s a blog you can consider reading: Step-by-Step Guide to Wireframes and Wireframe Design
2. Why wireframes matter
Wireframes are an important part of the UX design process for several reasons. They provide clarity to all team members working on a design and operate as a central visual reference point using which designers and stakeholders can iterate and develop. As a testing tool, wireframes enable designers to ask users for direct feedback before significant time or resources are invested into development. Thanks to their lack of decorative elements, wireframes also enable designers to hone in on a product’s functionality and usability, ensuring that the user’s experience is optimized and users can seamlessly reach their goals.
3. Different types of wireframes
Not all wireframes are the same, with different types of wireframes enabling effective design at varying stages of the design process. While low-fidelity wireframes usually consist of simple lines and shapes and can be produced at speed, high-fidelity wireframes are detailed diagrams that can include colors, icons, typography, and even images to show a digital interface design in its final iteration.
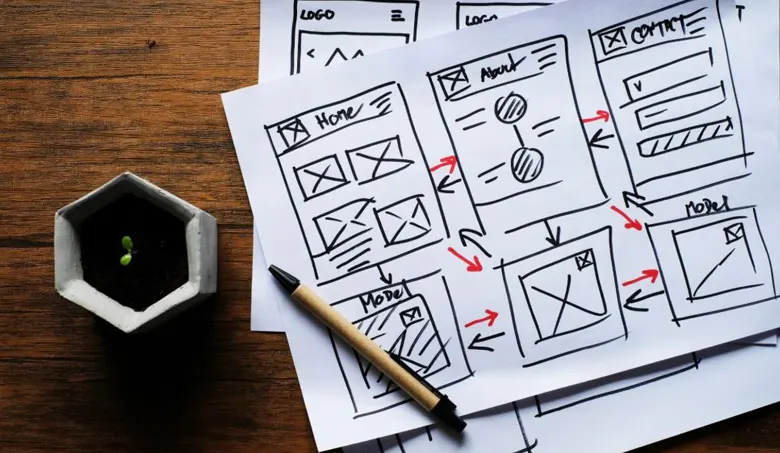
Some designers like to begin the process with hand-drawn, paper sketches to represent their ideas during the early stages of the design process before working on detailed, clickable, interactive wireframes further down the line to demonstrate the interface’s full functionality after more research, testing, and feedback rounds have been completed.

4. Seven steps for creating a website wireframe
Let’s take a look at the actions you need to take to create a website wireframe that will effectively support the team through the entire process.
i. Assess the scope of the project
The first step you need to take when creating your website wireframe is to assess the scope of your design project. This involves defining the user and business objectives as well as any requirements of the website. You’ll want to consider the website’s key features, functionalities, and content as well as your target audience, user needs, and any technical or team limitations that could impact the success of the design.
ii. Perform user research to identify needs and pain points
Employing user research tools and techniques such as surveys, interviews, and usability testing, your next step will be to gather insights from your target audience regarding their challenges, goals, and preferences in relation to the website you are designing. The qualitative and quantitative data and insights that you gather from this research can then be used to inform interface design decisions such as which features to prioritize and the positioning of content.

iii. Choose the right tools
While you may just need a piece of paper and a pen to initially sketch out your wireframes, you will likely want to explore more sophisticated wireframing tools as your project progresses and more detail or interaction in the design is required. When looking at wireframing software and tools, consider your team’s current skills, the project’s requirements, and your own or your company’s budget. Bear in mind that it’s advantageous to work with wireframing software that enables easy team collaboration and sharing.
iv. Draw rough sketches and layouts
With your user feedback gathered and your tools selected, it’s time to start sketching your website design ideas. Begin this step by drawing rough layouts of the page using either paper and pen or your preferred digital drawing tool. This exercise will help you visualize the basic layout and structure of your website interface and allow you to experiment with different arrangements of design elements. Keep iterating on your design until it provides the user experience you are hoping to offer, with seamless navigation that enables users to swiftly meet their goals. Keep in mind the goals of the project and the insights from your research so as to not lose sight of why you are creating the design and the problems it should solve.
v. Define content hierarchy
Although some elements of your interface’s structure will have been decided in the previous step, you’ll want to spend some time thinking about the hierarchy of your content and how that fits into the layout you have chosen. Content hierarchy is a term used for the organization and prioritization of visual information on an interface and how that impacts a user’s ability to navigate effectively and find what they need. In this step, you’ll want to place content within the interface based on its importance and its ability to support users in reaching their goals. To do this, consider using headings, subheads, sizing, colors, and fonts that help to clearly communicate your intended message and enable users to smoothly navigate between pages.

vi. Add basic design elements
Once the order and placement of your content have been decided within the wireframe, you’re in a good position to start adding in basic design elements such as navigation bars, buttons, and images to help visualize the user journey and support overall design flow. Depending on the detail of the rest of your wireframe, you may not wish to include more than simple placeholders at this stage which support the existing structure of the interface and give a clear indication of how the interface will function.
vii. Share and gather feedback
Once you’ve completed all these steps and have the first version of your wireframe completed, it’s time to share your wireframe with other designers on the team for their thoughts and feedback. At this stage, it will also be important to gather user feedback. A good way to do this is via usability testing which involves asking users to interact with your wireframe, performing specific tasks as though the sketch were an interface. Users are then asked to offer their thoughts on the design’s usability and effectiveness. This process helps you quickly identify any issues users face and improve on the design before it gets handed over to the development team.
5. Best practices for wireframe creation
Want to know how you can ensure your wireframes support the design process and lead to interfaces users will love? Here are our best practices.
i. Keep it simple
“Keep it simple” is a phrase you will hear often from leading design teams, particularly when it comes to wireframe creation. This is because by focusing on the main design and structural elements and eschewing detail at this stage in the design process, a designer is able to hone in on the core functionality and usability of an interface design and prioritize essential features and interactions. When the focus is on getting these central elements right–through research, iteration, feedback, and user testing–significant amounts of time and resources can be spared compared to when all of the detail has been added and it is more difficult to change.
ii. Use placeholders
Using placeholders enables you to create wireframes without getting distracted by or wasting time and resources on creating specific content details. Generic images and text help to communicate your intended purpose for each component without taking the focus away from the overall design concept you wish to convey. Placeholders also make it easier to iterate on your wireframe as they enable swift content-based adjustments without the need for hefty design revisions.
iii. Be consistent and clear
For a wireframe’s design to convey its intended message and purpose effectively, it should maintain a cohesive visual language throughout. This includes making consistent typography, spacing, and color scheme decisions which reduce cognitive load and user confusion and improve usability. Clear labeling and logical organization of components also supports user understanding and interpretation of the interface.
6. Top wireframing tools
While some designers choose to use paper and pen to create their initial wireframe sketches, for more complex designs it’s wise to use one of the many tools available.
i. Balsamiq
For the swift creation of digital wireframes, Balsamiq, is the perfect tool, particularly if you are new to UX design. The software provides users with the common design components needed for sketching an interface and supports collaboration with stakeholders and gathering feedback from users.
ii. Miro
Free wireframing tool, Miro, offers designers a range of templates and widgets which enable the fast creation of wireframes. Real-time collaboration is another feature that enables
teams to share ideas on a design instantly, supporting iteration and continual improvement.
iii. Sketch
Used by many professional UX designers and teams, Sketch’s minimalistic and intuitive interface makes it a highly accessible and easy-to-use tool which enables the creation of wireframes for every kind of project.
7. FAQs About Website Wireframe Design
i. How do I create a web wireframe?
Start by defining your goals for the interface, thinking about your target audience and what they will want to achieve on the website or app. With your goals and audience defined, sketch out the layout and structure of your intended interface using either pen and paper or a digital wireframing tool. Once the basic layout is established, you can begin to include basic design elements such as text headers, navigation menus, content boxes, image placeholders, and buttons. Focus on how the user will navigate through the page and what your design can do to assist them in reaching their goal.
ii. What are wireframes in website design?
A wireframe is a simple line drawing or sketch of the structure and components that make up the digital interface of a website. These basic diagrams consist of the forms, placeholders, and navigational components of the website and enable a designer to test their ideas with users, collaborate with other designers, and communicate their vision to the development team.
iii. How do I create a wireframe online for free?
While it’s free and easy to create a wireframe using just a piece of paper and a pen, there are also numerous free wireframing tools online that assist designers in the creation of digital wireframes. Figma, Penpot, Miro, Wireframe.CC, and Jumpchart, all offer digital wireframing tools that you can use completely free of charge.
iv. What are the six steps to creating a wireframe?
Designers typically follow these steps when creating a wireframe:
- Assess the scope of the project
- Perform user research to identify pain points and needs
- Choose the right tools
- Draw rough sketches and layouts
- Define content hierarchy
- Add basic design elements
The final step is to, “Share and gather feedback”, which takes place once the wireframe has been created and a designer is ready to collect suggestions and ideas from other designers, stakeholders, and users to improve on the design.
Conclusion
Using our beginner’s guide to designing a website wireframe, you’re in a strong position to create the first sketches of your website’s interface. To ensure you reach the project’s goals, try to focus on the functionality and usability of your wireframe over decoration or aesthetics and test your ideas with users as early as possible to get a feel for the success of the design. If you don’t have access to your target users at this stage, simply ask for feedback from other designers, or friends and family. Ask them how they would navigate through the design you have created can also provide you with valuable feedback and insights that you can use to inform improvement to the design. Don’t be afraid to keep working on your sketches until your testing shows it fully meets all the user and business needs. When you’re confident it does, it’s ready to be implemented.
Next steps
We hope our guide to designing a website wireframe proves to be a valuable resource for beginners venturing into this essential aspect of UX design. To find out more about UX design and wireframing, head over to our blog for more articles like this one, or consider going through the following resources:
- Watch this session by Shiva Viswanathan, Design Head of Ogilvy Pennywise, and Naman Singh, Product Experience Designer at RED.
- Talk to a course advisor to discuss how you can transform your career with one of our courses.
- Pursue our UX UI Design courses – all courses are taught through live, interactive classes by industry experts, and some even offer a Job Guarantee.
- Take advantage of the scholarship and funding options that come with our courses to overcome any financial hurdle on the path of your career transformation.
Note: All information and/or data from external sources is believed to be accurate as of the date of publication.


